Showing posts with label technical information. Show all posts

Saturday, April 2, 2011

Avid BB-7 Disk Brake Adjustments

Rear brakes
A shot of a road version of the BB-7 Avid mechanical disk brake - his example is nice and clean, rather than using an image of mine ~

Even this very detailed description and advice does not cover the problem I had with BB-7 brake set up that neither the bike store that sold me the bike with these brakes nor mechanics at my LBS were able to identify.

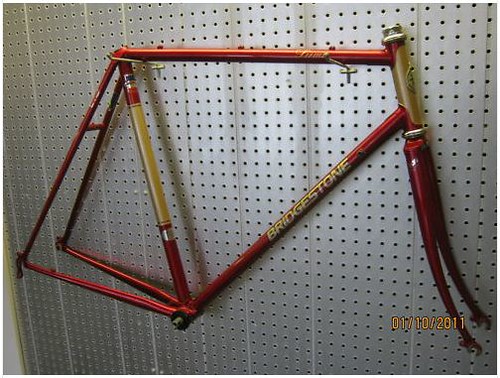
I bought a Traitor Ruben in the summer of 2009. I generally ride it to commute to work when the weather looks like rain or is otherwise crummy - otherwise I ride a more pleasant (in my view) road bike. One of the main advantages (if not the main advantage) is that in rain the mechanical disk brakes, Avid BB-7s, have no noticable drop-off in performance that you have with rim brakes. The problem can be that adjusting these brakes to perform reasonably whether raining or not can take some effort.

The many-step process described by the blogger above leaves out the problem I was eventually able to correct that seriously lowered the BB-7s' performance for me. The problem I had stemmed from incorrect setup by the store that sold the bike to me. (Or perhaps by the company that produced it, I suppose.)

out with the old, in with the new
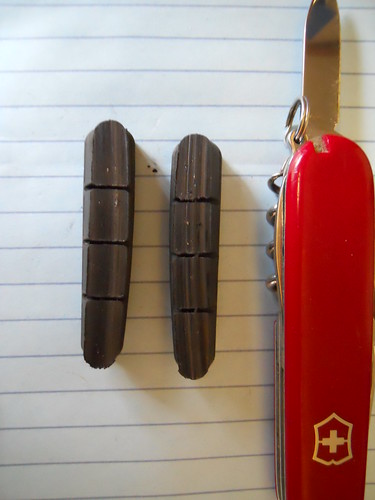
Two disk brake pads not yet mounted in their spring are at left, two mounted in spring (they look like a tiny waffle iron) are at right.

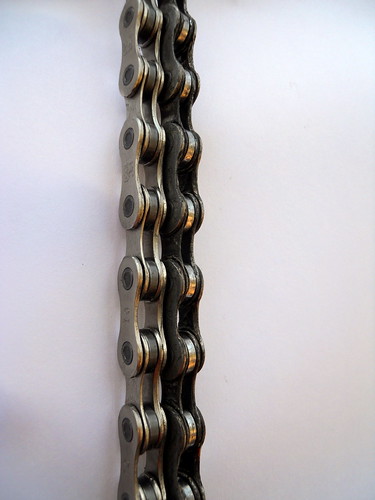
In order to operate properly, the brake pads, pressed together with their spring into a kind of brake pad-sandwich, need to be inserted fully into the caliper slot. Each pad has two small "ears" that are supposed to fit into a metal clip that is inserted into the caliper from the opposite side from where the brake pads slide in. As it turns out, this clip is quite strong and getting the pad "ears" to fully engage with the clip takes a bit of force - and if you convince yourself that they are fully seated (it isn't readily apparent whether they are or not by visual inspection) then the brake pads don't lay flat against the pistons but instead are sort of balanced on top of two pins that are in the middle of each of the pistons. When the pads click into the clip properly the pin on the piston will seat in a slot in the back of each pad and hold them in the right place. (Yes, hold them in the right place in addition to the clips - the clips that seem to work more to keep them out of the right place.)

What this means is that instead of having the pads solidly pressing against the pistons on each side, they are wobbling around, made parallel to the disk only by the tiny spring that is intended simply to push them apart. It is possible for an otherwise sensible bike mechanic to perform the usual setup process and miss that the pads aren't fully inserted. When the pad aren't sitting fully against the pistons, the pads wear at a highly accelerated rate and the performance is poor, although it isn't so poor as to indicate the serious problem you actually have in this situation.

Avid BB7's
Here you can see the slot where the clip inserts, just to the left of the red adjustment dial that is visible

My simple solution that Avid would doubtlessly not like was simply to take the clips out and insert the pads fully so they were in the right place and mounted on the pistons properly, and leave it at that. The little posts on the pistons are inserted into slots in the back of the pads and keep them in place just fine, it seems. I did try to insert the clips after the pads were in the right place, but that didn't work, so I just left them off. I had a BB-7 on a bike (just on the front fork) that I gave away that was an older model (before this "mtn" and "rd" distinction appeared) and I don't think it even had this clip, so I decided that I couldn't see any reason why if the pads were properly inserted that the clip was necessary. With the pads fully inserted it has been much easier to adjust the brakes to achieve decent performance (and pad wear). I have been riding like this for 500 miles or so, no problem.

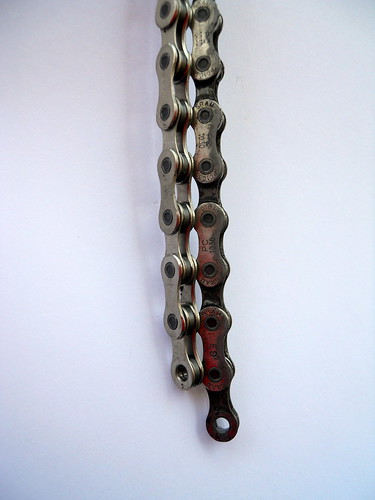
So, how did I discover that I had this problem that mechanics didn't see? I had a separate problem with the rear wheel of this bike and had it rebuilt when several spokes blew (described in this post) so I had my LBS that rebuild the wheel and when they put it back on the bike the guy neglected to tighten the skewer enough and silly me didn't check his work so I was riding in a downpour and the rear wheel popped out, yanking the brake bads and spring out. (Luckily I did not fall, although I was mighty surprised.) When I looked closely at the wear on this set of pads, I realized something other than simple adjustment was wrong. I bought new pads for front and back and realized upon more thoughtful examination that the front pads weren't fully inserted (and presumed this had been the problem with the rear one as well). Geez!

I guess the sense that disk brakes are a little more complicated to adjust masked the more serious problem since I assumed that the bike store had set the things up properly in the first place. At one point, tired of making constant adjustments, I stopped at the other good LBS and a mechanic performed his version of the setup but while it seemed OK for a while, it was back to poor performance in a day or so. Anyway, I guess I learned something - perhaps even several things.

In addition to my disappointment with professional bike mechanics in this (which isn't really that great; this isn't brain surgery) I think the Avid instructions supplied are part of the problem - they are pretty poor. The Avid PDF manual (that is the same as what is delivered with the brakes) states that pads should "click" into place but the critical importance of seating the pads in the clip isn't mentioned specifically as the necessary requirement. The two pages have the same information in nine languages, so the degree of clarity in any particular language is proportionally reduced. The steps to take are described, but not much "why this step is important" sort of info.

Saturday, March 19, 2011

108 Links, Half Inch of Stretch (Full Link)

Matches up here
New chain and old chain match up for while, more or less

On the left is a new SRAM chain for my Traitor Ruben, on the right is the original SRAM chain after (?) 3,000 miles (I guess). Turns out the original chain is the 1030model, which is the least expensive 10 speed chain they have (and stretches the fastest, it seems). Since my "good" road bike has a Shimano CN-6600 10 speed chain that hasn't stretched yet, after more like 5,000 miles, I was quite surprised to realize (a) that this was a cheap chain, and (b) that it has stretched a lot.

New chain, old chain
Over the full length of the chain, full link worth of stretch

The chain has 108 links (one half inch per link, when installed - total of 54 inches) plus a "power link" to hook the ends together. After however many miles I have gone, the chain is now one full link (one half inch) longer overall. Should have replaced it a while ago! To slow down this problem, I bought a better grade of SRAM ten speed chain to replace it.

It isn't the chain plates that stretch, of course, but the pins inside that bend. I don't think this caused the cogs or rings significant damage. Hmm . . .

Sunday, January 16, 2011

Building Up a Bike - Getting Started

1980s Bridgestone Serius frame

Having completed the "Park Tool School" (for bike mechanic basics) a while ago I am interested in seeing if I can bring together all the (used) parts of a bicycle, assemble them, and have something ridable. Well, something even fun to ride, actually. I have started by buying a old-ish steel frame on eBay (above). I liked the looks of it, a lugged frame, that includes the bottom bracket and (the thing the pedals attach to) and a fork.

So now I have to acquire all the stuff that bolts to the bike - and make sure I get the right stuff for this frame (where it matters). Much of that is what is known as the "gruppo" or group - gear shifters, brake levers (or integrated brake levers/shifters), brakes, front and rear derailleurs, a bottom bracket, a crankset, a chain, a cogset and a freewheel (or cassette). One small problem is that I already have a bottom bracket but near as I can tell, people selling older groups on eBay often don't include that. It is an interesting puzzle to sort out what would work with this frame (and what won't).

My first puzzle is with crankarm length - that is, how long the arms that have the pedals on them are. (This iscertainly not the only or most important thing to figure out but the one I have bumped into first.) Various lengths are available, but most road bikes come with 170 or 172.5 mm. I believe my two road bikes have 172.5, but I realize I would have to measure - it isn't in the technical details supplied with one of them and the other was rather short on such info generally.

I have already found a detailed bicycle crank length discussion that suggests that the Shimano 105 group I have located with 170 mm cranks would be fine (assuming I can successfully purchase it).

Of course a more reasonable question is why Shimano 105? Hmm...

Saturday, January 8, 2011

Metal Crud in Bike Brake Pads

Metal flecks in bicycle brake pads

One bike mystery for me is where these little bits of metal come from that regularly get embedded in my brake pads (see above) and cause an unpleasant noise when braking, not to mention less braking action and more rim wear. Are some of these metal flakes from the rim itself? It seems likely, somehow, but also puzzling and troubling - why would that happen?

The above pads are only the second set I have installed on this bike - they are stock Shimano DuraAce/Ultegra pads. (The first set lasted around 4,000 miles - I don't ride in the rain on this bike.) Many folks recommend Kool Stop brake pads rather than Shimano - one forum entry even specified that Kool Stop would reduce this metal-flakes-in-brake-pads problem! So I guess my next set of brake pads will be some of these.

The pocket knife is the device I use for removing the small bits of metal. It may be the easiest bike maintenance task there is, but I don't much care for it.

Sunday, December 26, 2010

"The Dancing Chain" (Book for Christmas)

The Dancing Chain (third edition) is the "history and development of the derailleur bicycle" and a wonderful book. Just got it for Christmas - previously I had looked at the second edition but the third is updated/added to quite a bit.

Dancing Chain Cover

Reall, though - the subtitle is a bit off. What this is is a history of the 20th century (and now into the 21st century) bicycle as influenced by the development and imnprovement of derailleurs.

Dancing Chain Sample Page

Chapter 15 is a helpful explanation of "how derailleurs work" that is good to look at early rather than at the end - but then this isn't exactly the kind of book that one reads from start to finish but rather dips into here and there.

This is one sort of book that's not going to be replaced by an e-book reader soon!

Thursday, November 11, 2010

Alternatives to the "Traditional" Chain

Almost all bikes today have chains that are remarkably similar to each other and to chains of 100 years ago. All chains have pins that are 1/2 inch (and not some metric distance) apart - this means that it is fairly easy to check if a chain is "stretched" without special tools. (It isn't really that the chain stretches so much as that the pins bend, resulting in a longer chain.) Simply matching up a ruler to a straight length of the chain for 12 inches will show whether the chain is longer than it should be or not. If the chain is stretched more than a few percent longer than it won't match up with the teeth on the cogs and rings and can ruin them - and chains are cheaper than cogs and rings. If you let it go long enough, chains can break - I once saw a fellow break a chain while crossing 14th St on Independence in DC. Rather an abrupt stop.

I'm told that at some time in the 1990s Shimano introduced a chain with one centimeter between pins - the resulting links were closer together and of course the cogs and rings had to be with teeth that were also closer together. Like many "innovations" that represent a pointless departure from traditional approaches, it didn't catch on.

An idea that is presented as new but is actually from the 1890s is to replace the chain and rings with a drive shaft - in other words, before there were cars with drive shafts, there were bicycles with them. Wikipedia's article on bicycle chains notes that a bicycle chain is more than 98 percent efficient in transmitting power, so the big problem with other systems has been that they are usually less efficient.

This 1900 catalog has a shaft drive bike listed first:

The superiority of bevel gears for power transmission in the bicycle has become established beyond question.
Actually this is clearly not true, but the next statement about how well the shaft drive lasts (29,000 miles!) compared to a chain of those days was probably a strong favorable consideration.

At 65 dollars, the shaft drive bike is the most expensive model that this company was selling at the time. Presumably the big plus was that the shaft drive was cleaner than a chain, and for women didn't require netting over the rear wheel and chain guards to keep skirts out of the chain system. One suspects the absence of systems to demonstrate the lesser efficiency may have also contributed to a continuing interest in chain drives. Note that the drive shaft took on the role of the right side chain stay in the bike's structure.

For whatever reason, some early bicycle manufacturers pushed shaft drive bicycles for some time. They were even used by cycle racers - the African American rider Major Taylor rode shaft drive bikes in races, for example. But eventually they fell out of favor - for one thing, they were always more expensive than the comparable model with a chain. Also, removal of a rear wheel to work on a flat tire appears to be more complicated on a bike with a chain drive.

Notwithstanding all that, there have been attempts in recent years to introduce bikes with shaft drives, generally on bikes where the perceived lower maintenance and cleaner aspect of a shaft drive would be attractive, usually paired with an internal hub shift system.

Dynamic hybrids
In this modern example, there is a chain stay and the drive shift.

Another, probably more sensible approach is to use a drive belt to replace the chain. The belt is based on timing "chain" (or belt) technology developed for cars and these belts are incredibly strong - and require no grease or lubrication, so they stay clean. Ixi Bikes makes a small easy-to-disassemble (but not folding) bike with a belt. Trek makes several different full size bikes with belt drives, such as the District single speed, below. The belt drive seems to be pricey compared to a chain but is almost certainly just as efficient.

Trek District

The Bicycle Chain - 1896

The technological improvements in modern bikes over those of the 1890s are much less than the 120 years would suggest likely. One of the critical "ingredients" for the first "safety bicycles" was the use of a chain to connect the rear wheel to a drive shaft with pedals (rather than pedals at the center of a large front wheel). The basic structure of a bicycle chain has not changed in all that time, but I was surprised to see that there were variations - the 1896 Victor Bicycle catalog (from Overman Wheel Co.) shows a chain where the sprocket teeth are spaced further apart and engage the chain only between every other (rather than every) link.

1896 Victor bicycle chain

1896 Victor bicycle sprocket

Commercial catalogs collection. Overman Wheel Co. Victor bicycles. 1896, University of Michigan.
Available online: http://hdl.handle.net/2027/mdp.39015071455961


Perhaps the perceived advantage was that each of the sprocket teeth could be much more substantial, but the trade-off of having half as many teeth makes this seem a wash and somehow the symmetry of the chains we use today seems more efficient (and in any event, that chain won out). Would this approach mean that the pins would bend less? (That may have been a problem in those days.) And maybe the relative cost of chains was more than today so a sturdier chain for the money seemed wise. Hard to know at this distance in time.

Tuesday, November 2, 2010

Tires for Road Bike -> One on Front, Different on Back

If the weather is good (not wet, not below freezing, generally) I will commute the ten miles each way to Capitol Hill on my carbon fiber road bike rather than my steel road bike that has disk brakes.

One of the main issues I have had is with tire wear. I had Michelin ProRace2 tires and then after they were discontinued, the successor model ProRace3. They are a bit pricey, though, often listing for more than fifty bucks each.

More importantly, I haven't been happy that the ProRace tire on front wears well while the one on back wears quickly. In particular, the center of a new ProRace tire is raised in a pronounced way that I like to imagine reduces the rolling resistence but on the back this wears away in about 500 miles, leaving a flat spot instead. You can switch the tires front to back, but then the one that was in good shape on the front is quickly in same not-so-good state.

Performance has a tire from Vredestein, the
Fortezza SE Road Tire that for a while was often on sale for around 25 bucks (although now they are $34) and customers mostly seemed to have given them good reviews. I thought I would try a set of those and bought a pair - as it happened, I then got a slash ruining a not-very-old ProRace3 so now I have a Fortezza SE on the back and a ProRace3 on the front. This has worked very well - better, I think than having a Fortezza front and back. The Fortezza is a strange clincher that takes up to 160 PSI and says it needs a minimum of 110! (The ProRace3 has a max of 116 PSI.) I tried putting 140 in the back tire but the back end of the bike become too "lively" so I run with about 120 in back, 110 in front and it seems to work fine.

I can't say that I have a lot of confidence in the grippiness of this set up for high speed sharp turns, or even moderate speed ones in rainy weather, but I don't make high speed turns (much) and try not to ride this bike in the rain - problem solved. The road grip of the front tire, the ProRace3 is probably fine, but I'm a little suspicious of the Fortezza in back, but really I am not sure. I'm not testing it.

Michelin has a new tire that takes the same approach - the Michelin Pro Optimum has different characteristics for the front tire version and the back tire version:
Michelin has developed separate front and rear tires to take into account their specific requirements: The front tire carries 30% of the weight load and absorbs 100% of the braking effect. For this reason, Michelin engineers made it a priority to develop a tire with added grip, capable of providing maximum safety to users on cold, wet surfaces. The rear tire carries 70% of the weight load and absorbs 100% of the torque generated by the bike's forward motion, which affects its efficiency and wearlife. In order to achieve consistent performance, the rear tire now has a longer life, meaning that MICHELIN Pro Optimum Front and Rear tires now have comparable lifespans.
(Michelin Pro Optimum Front & Rear)

I suppose comparable tire life spans seems something to suggest as a "feature" since many folks buy the in pairs but as a goal it seems less important than simply having good riding characteristics. And it just seems unlikely - rear tires are going to wear faster, period. I'm figuring I'll go through two Fortezza tires on the rear to one ProRace3 on the front.

Mix and match - a good idea, it seems.

Thursday, August 26, 2010

Bike racks, parts

Rivendell Bicycle Works has an blog with an interesting page about racks - I have been thinking that my commuter bikes rear rack set-up might be more to my liking if I switched to a front rack set up, but it will bear some further investigation.

Another interesting parts site is bicycleclassics.com even if the web site development work is awful.

Sunday, August 22, 2010

"Wheel flop" and other such terminology

One can easily feel that an engineering degree would be useful for understanding bicycle design and optimization.

What makes a bike handle beautifully does a good job of explaining wheel flop, rake, offset, and other terms.

The Bicycle Quarterly glossary comes at this from a different (and also helpful) direction.